The Orange Purse Completed

Elegant Edibles purses from Knitpicks

I mentioned these two fruity purses to you a few weeks ago, as they’d risen to the surface of my projects needing to be finished. They were from a kit from Knitpicks called The Elegant Edibles kit. (That’s a Ravelry link – the pattern is no longer available.)

I knit the orange and the kiwi, but never finished them and put them aside. That’s changing now. 🙂

The orange was like this:

Orange purse from Elegant Edibles Knitpicks kit, knit by Deborah Cooke

Usually, when I put a project aside, there’s a reason. I had no idea how to line the orange, given its unusual shape, plus I thought it was too floppy to make a good purse. Similarly, I liked the handle of felted leaves, but it felt too soft to be functional.

One review, I decided to interface the lining. For the shape of the lining pieces, I flattened the bag and traced around the crescent shape, then around the arc of the “rind”. I added 1/4″ seam allowance on the edges and cut the lining. I then added some interfacing to the “rind” edge to give the purse some body. I trimmed a piece of curtain header (buckram) to the shape and stitched it to the lining fabric so it wouldn’t shift around, then assembled the lining.

You can still see those stitches. There was no chance of matching a print with so many colours, so I went with white for contrast.

Orange purse from Elegant Edibles Knitpicks kit, knit by Deborah Cooke - lining and reinforcement of base

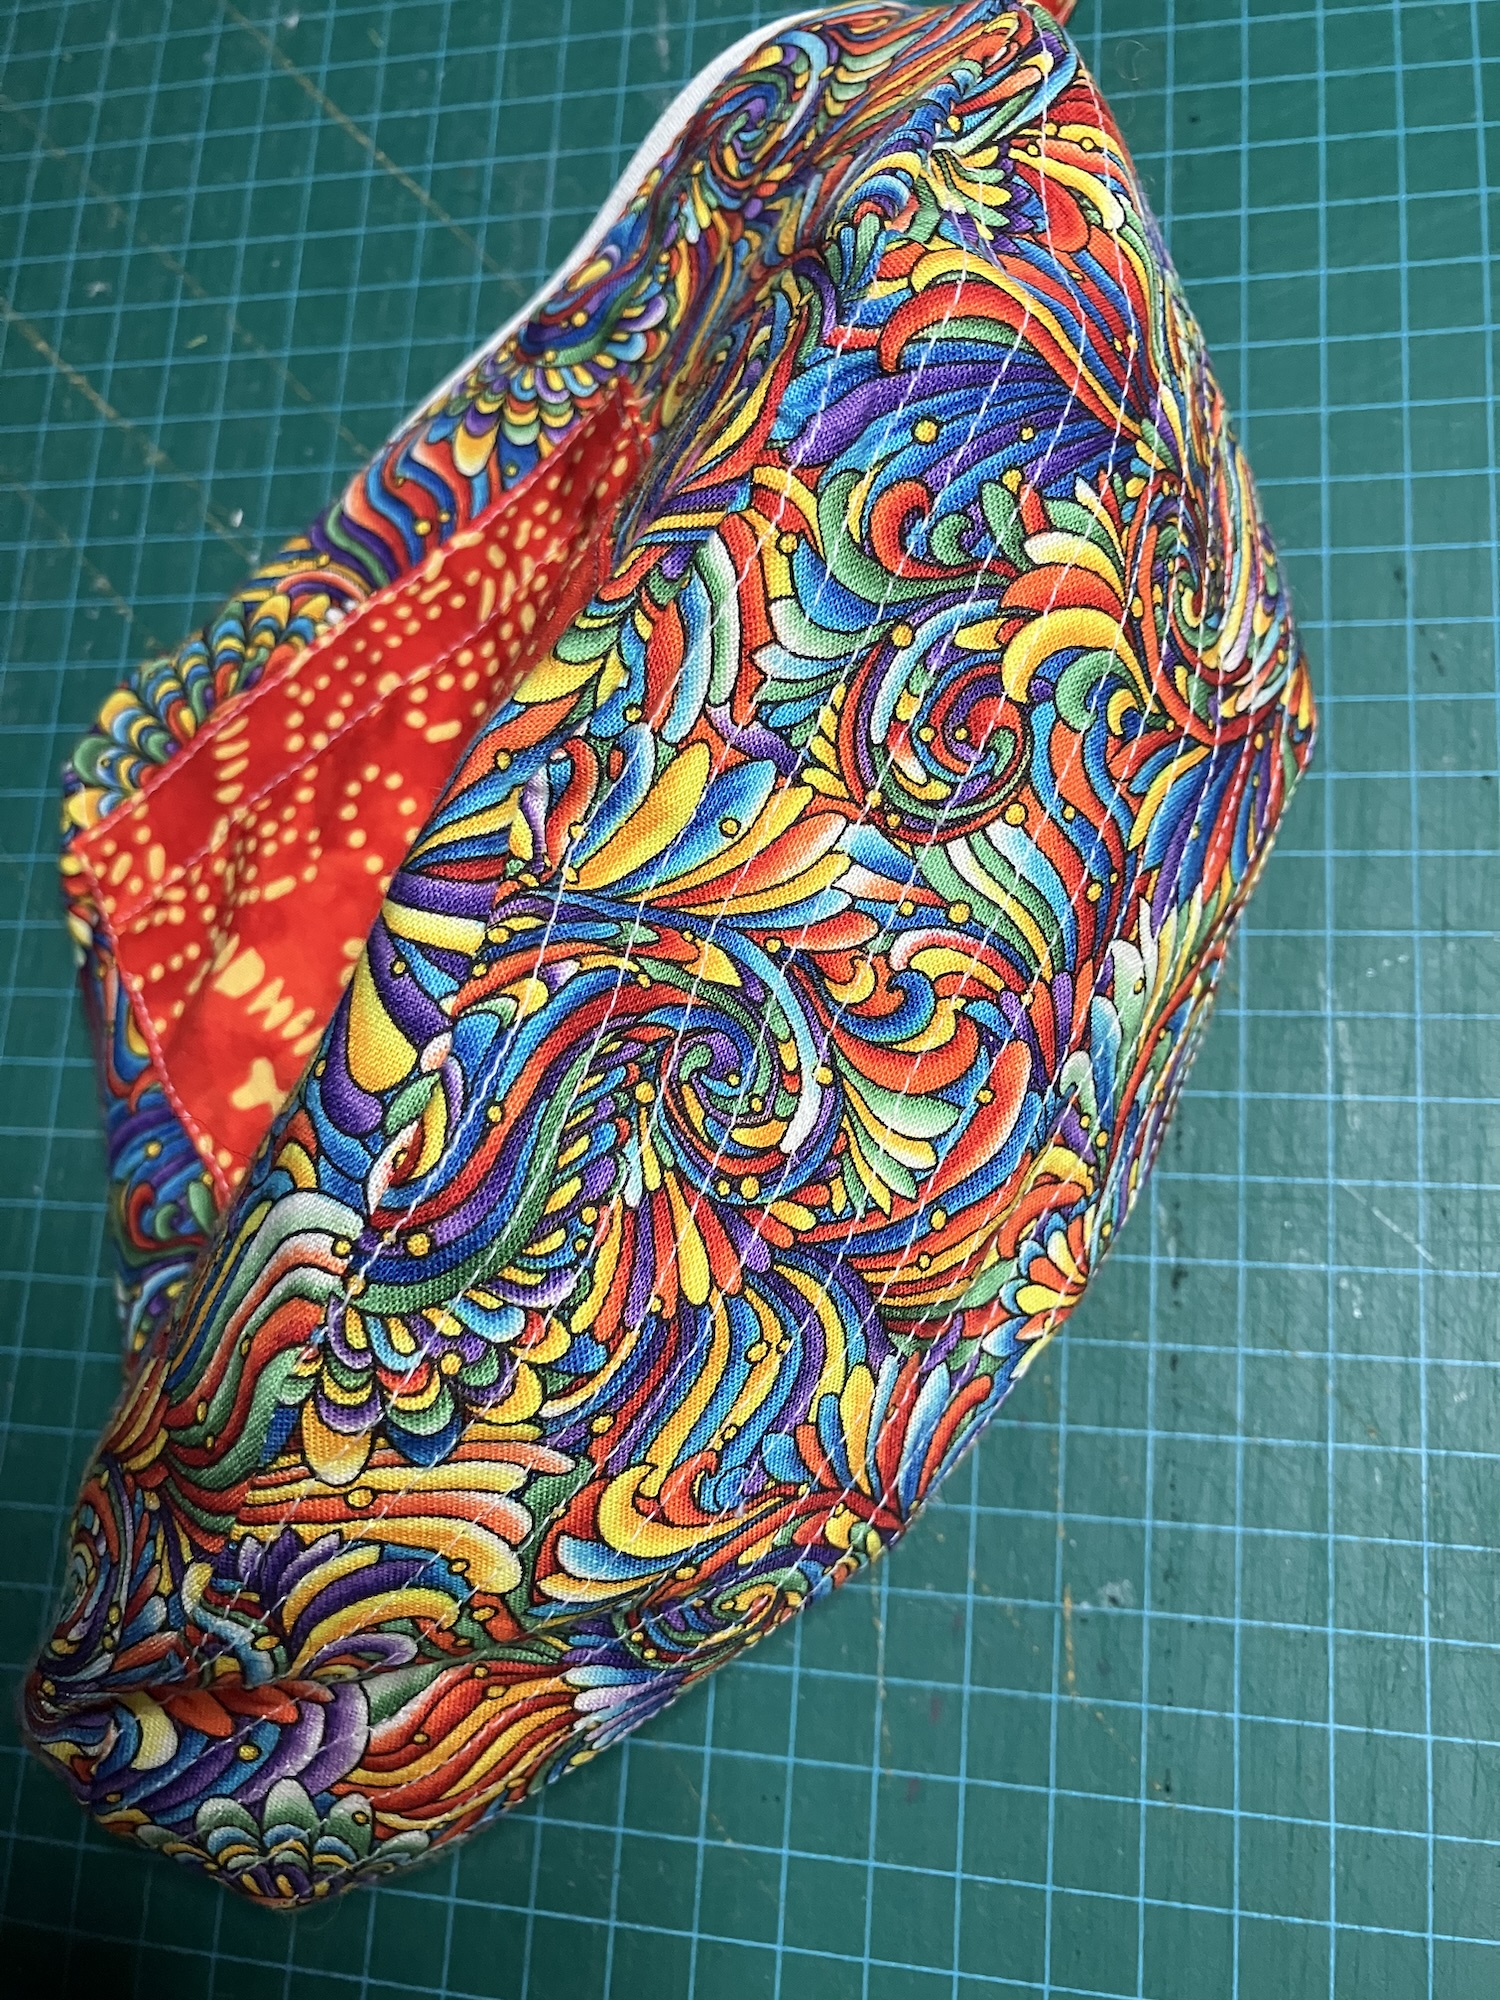
Here’s how the lining looks with the purse on its side.

Orange purse from Elegant Edibles Knitpicks kit, knit by Deborah Cooke - lining completed

Of course, I added an interior pocket. Just for fun, I used a contrast batik. The open edge of the pocket is parallel to the zipper.

And here’s the bag turned right side out:

Orange purse from Elegant Edibles Knitpicks kit, knit by Deborah Cooke - bag with zipper

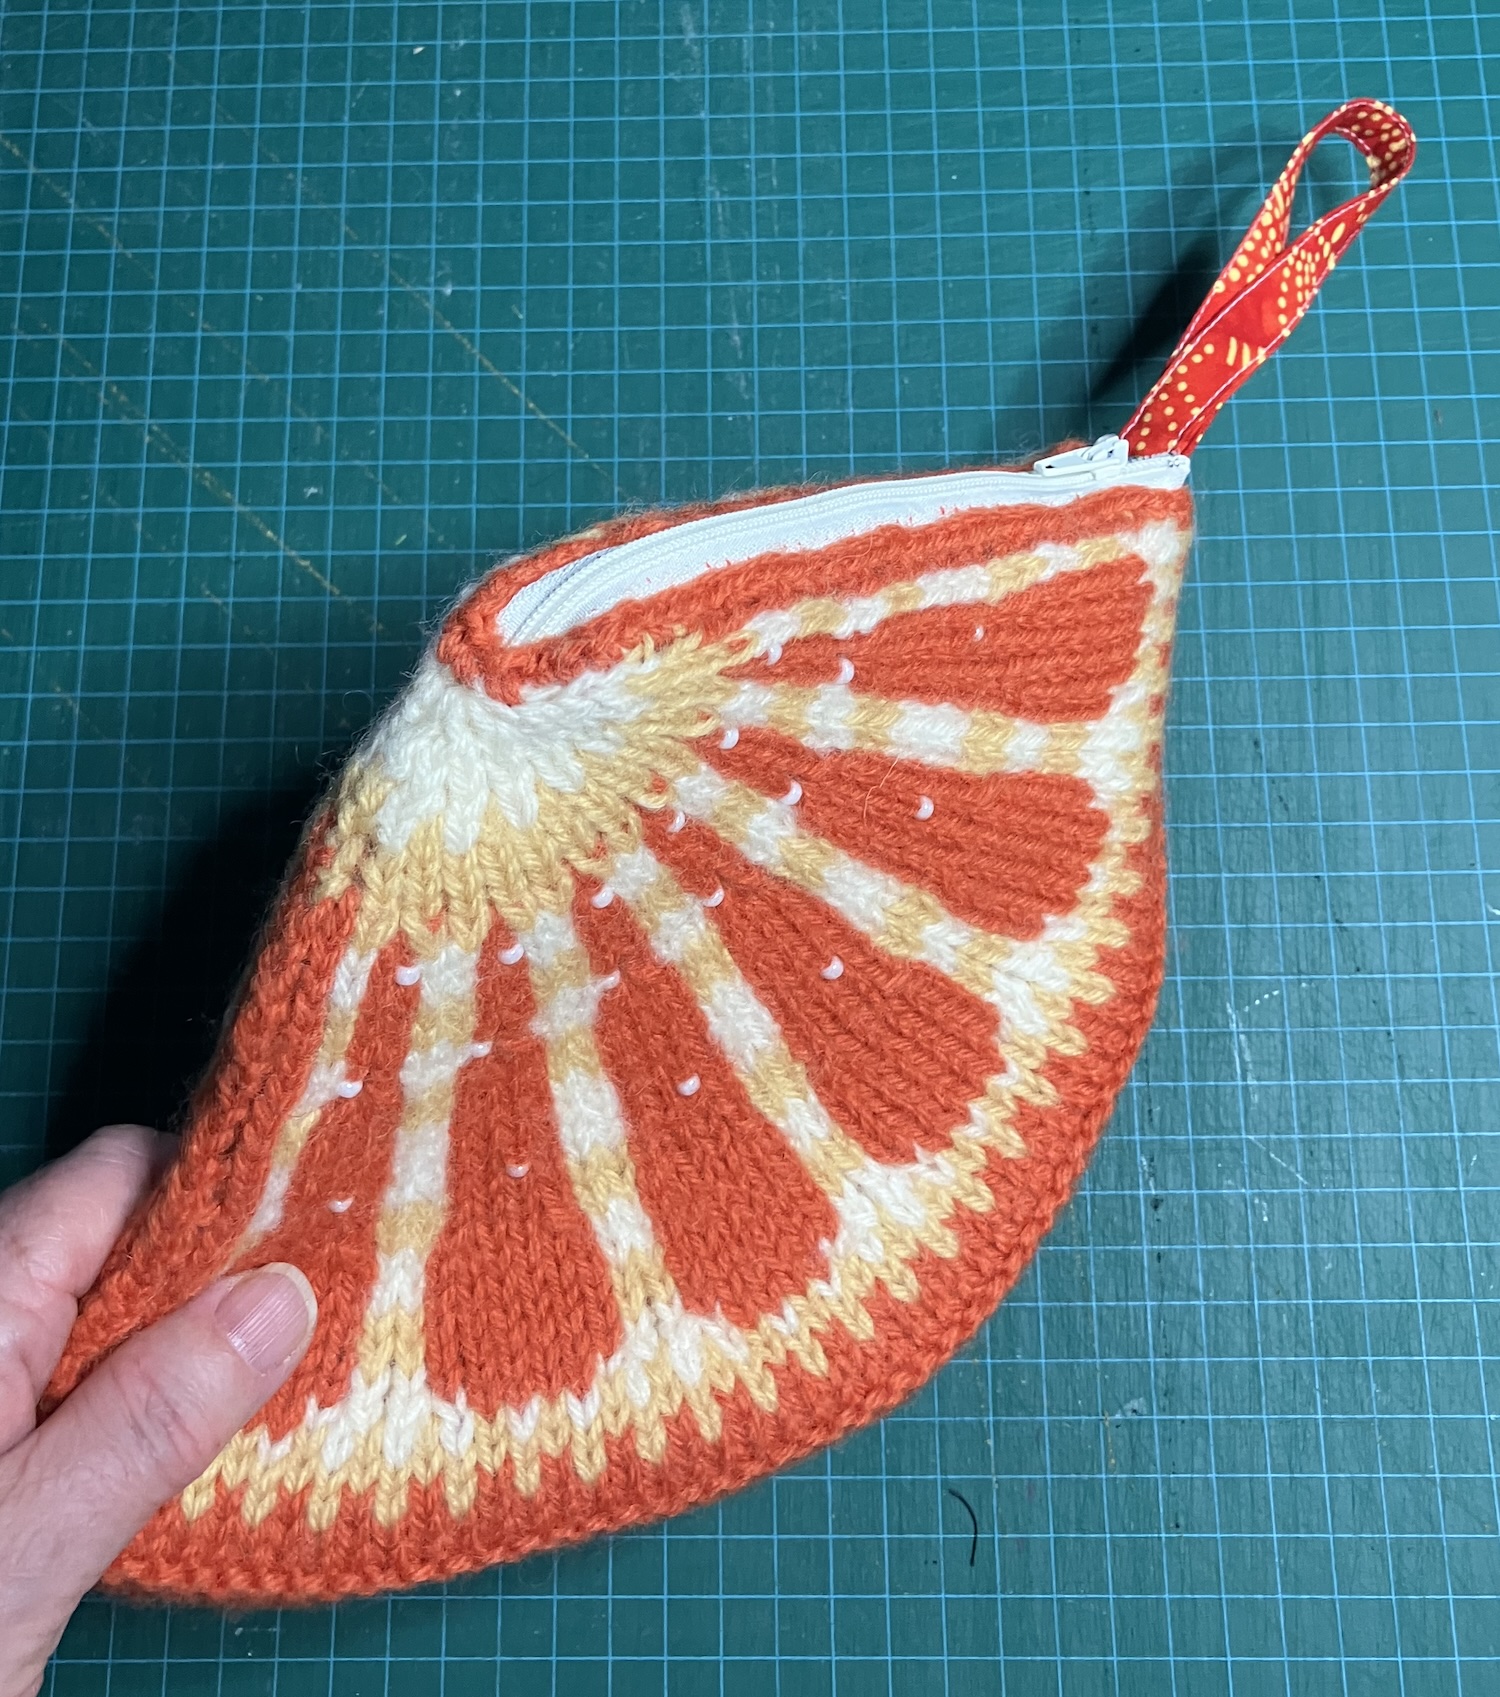
Finally, here it is all finished up.

Orange purse from Elegant Edibles Knitpicks kit, knit by Deborah Cooke - completed purse

I like the felted leaves a lot, but they’re a bit soft for a handle. Twining them around the fabric handle makes for a more sturdy solution. I’ll see how it works out but might stitch that felted wool handle right onto the batik. Overall, I’m pleased with the result. 🙂

Next up, the kiwi purse.

Vintage Knitting Patterns for Dolls from Mary Maxim

Last week, I discovered these older knitting patterns for 11.5″ fashion dolls available as PDFs from Mary Maxim. They were also on sale at the time, so I snapped them up. They include quite a number of garments each.

Mary Maxim's Fashion Doll Wardrobe

The first one is called Fashion Doll Wardrobe – you can find it on the Mary Maxim site right here.

It includes a (blue/white) houndstooth coat with pants, top and hat; a (green) poncho and dress; and a (peache/blue) capri set with top and short pants.

Apparently, the top and capris both have a beaded fringe at the hem, although it’s tough to see in the picture. The whole thing looks like an old photocopy. 🙂

Mary Maxim's Fashion Doll Wardrobe

The second one is also called Fashion Doll Wardrobe – the pattern samples are all knit in red and white.

It includes a “skating outfit” with sweater, skirt and headband; an “aran outfit” with sweater and skirt; a “casual outfit” with sweater and pants (I think that’s the top middle one); an “office outfit” of dress and short jacket; and an “evening outfit” of a long skirt and sleeveless top.

Again, the PDF pattern looks like a photocopy, but there’s a chart for the top sweater. It has a contrast star on the back.

Mary Maxim Teen Doll Pattern

The third pattern has a black and white product image, which is very fuzzy. This one is called Teen Doll Pattern.

From left, the pattern includes a coat and boots, worn with a straight skirt; a skating dress with panties; a long dress with an eyelet pattern on the skirt; a jacket, pants and tank top; and finally, a crocheted long dress.

Mary Maxim Teenage Doll pattern book

Finally, there’s a very vintage pattern, Teen Age Doll Pattern Book. The description says it includes 8 outfits. Ravelry lists the original publication date of this book as 1950 but that can’t be right. The doll on the right is Midge, who was introduced in 1963.

There is the 3-piece suit for B shown on the cover, and the 3-piece outfit for K shown on the cover. There are two dresses for B: one “off-shoulder” and one v-neck. Both have a hat and purse. There’s a v-neck sweater and hat for both B and K – these look like polo shirts to me. There’s a Bermuda shorts set for both B and K, including shorts, sweater, knee socks and hat. There’s a sweater, skirt and hat for B with Rudolph on the sweater front. (That’s what it says. I don’t see it, but maybe it will be more clear in real life.) There’s a coat, hat and purse for B with fur trim which is very pretty. Then there are “ski outfits” for both B and K, with sweater, pants, mittens, socks and hat – knit in a variegated yarn, they look a bit like pjs. 🙂 I count more than 8 outfits in total, so there’s a lot of knitting in this little book.

All of the knits call for either fingering weight yarn on 2.75mm needles, or DK/sport yarn on 3mm needles. Sounds big to me, but I’ll check it out.

Mary Maxim Teenage Doll pattern book

Ravelry shows a book (Mary Maxim, Teen Age Dolls, Vol 2: Mary Maxim Exclusive Knitted Sportswear for 9″ to 11½” Teen Age Dolls, Vol 2) which has classic Mary Maxim sweaters for Barbie, Ken and Skipper. Those would be fun to knit.

I found a print copy of this one on Etsy and have ordered it. I figured I’d print it out since the sweaters are charted, so a print copy made sense. I’ll tell you more about that one once I dig in.

Cute Embroidery Kits from Kiriki

Kiriki Press doll kits

These kits were featured in the current issue of Threads Magazine, as a gift suggestion for sewists. I took the suggestion and bought myself two of them. They are incredibly cute.

The kits are for stuffed and embroidered dolls – many of them are animals – from a company called Kiriki Press in Toronto. You can see the range of options on their website – and a few of them in this image at right from their site.

The doll kits are presented by level, which is determined by the amount of embroidery on each one.

Kiriki Press Starter Kit for Raccoon

I bought the raccoon in the starter kit, partly to avoid having to hunt down an embroidery hoop of the right size. (You can choose any design in the starter kit or just on its own, as the sheep below. You can also add a hoop to any order, which I didn’t notice earlier.)

The starter kit includes the hoop, as well as a pair of stork scissors and the instruction book of stitches. It also includes the same items as in the individual doll kit – the embroidery floss, screen-printed fabric, stuffing and pattern.

Kiriki Press Kit for Sheep

I bought the sheep in the doll kit, so I have two critters to make. Both of these are level 3 kits, with most of the surface covered with embroidery.

It was tough to decide. I loved the wolf and the otter also, and the hedgehog is adorable. Hmm. I also loved the keeper bears, but they were sold out. It looks as if they’re back in stock, so maybe I’ll treat myself once these two are finished up.

I thought they’d make nice projects for a snowy evening and am looking forward to starting the raccoon.

Hankie Chic Caracas Dress for 12″ dolls

Caracas pattern for 12" dolls by Hankie Chic

I made some holiday dresses for the girls, using this pattern by Sylvia Bittner at Hankie Chic. The pattern is called Caracas, and you can buy the downloadable PDF from her online store right here.

This dress has an interesting wrap around the shoulders. It’s attached to a bodice flap overlapping the front body of the dress. The skirt has a big pleat in the front, then there are three bead buttons at the side of the bodice.

I found this pattern an easy make, so long as I didn’t think about it too much. I referred to the pictures of the final dress for that front pleat, because I would have sewn it down wrong otherwise. Similarly, I wrapped that shoulder bit a couple of times before I was convinced that I had it right. It folds back on itself (kind of) which confused me at first.

Here’s the first one I made, modelled by Continental Holilday Silkstone B.

Caracas pattern for 12" dolls by Hankie Chic made in red silk by Deborah Cooke

The three little “buttons” are gold beads, although they’re hard to see from this angle. I also bought the girls some Kaiser stands, which are pretty awesome. They almost disappear and are much more stable than the stands that come with the dolls.

I really like the base bodice design on this dress – it has a center front vertical seam from the waist to the bust, then a crosswise dart on the bust – and may use it in other garments. It fits quite well.

Caracas pattern for 12" dolls by Hankie Chic made in red silk by Deborah Cooke - bodice detail

I did change the order of assembly, in my usual way. I really like to sew the skirt and the lining together at the hem while they’re still flat, then understitch the lining. I did that with the skirt, then the same with the bodice. My handsewn seams end up being the waist seam in the lining, then the back edges to finish up.

I am lucky to have a number of friends who sew and who give me scraps of their wonderful fabrics. The red dress is made from a silk taffeta given to me by Laura.

Caracas pattern for 12" dolls by Hankie Chic made in blue silk by Deborah Cooke
Caracas pattern for 12" dolls by Hankie Chic made in pink silk by Deborah Cooke

The blue and the pink are from silk remnants given to me by Helen. The girls like them all. 🙂

These models are Lingerie #6 in the blue and Lingerie #2 in the pink.

After the first doll was dressed, I realized that she reminded me of Ravishing in Rouge from 2001. I had a look and found one at the right price, so she’s joined the other girls here. She really is lovely.

2001 Ravishing in Rouge Silkstone Barbie

I’ve still planned to make another Caracas, with the wrap in a contrasting fabric. For the moment, though, the girls have some party dresses for the festive season ahead.

Finishing the Jumping Jax Flash Quilt

Jumping Jax Flash quilt designed by Judy Niemeyer

One more quilt has made its way to the shop with the long arm quilting machine and come home to be finished. This is Jumping Jax Flash, a Judy Neidemeyer design that I pieced at least twenty years ago.

Here’s the pattern envelope at right – the pattern is discontinued. This link will take you to the Quiltworx page for this design. There are still some paper copies of the pattern around – I found one at Etsy and one in a US quilt store when I was looking for an image. If you want to make one, you can find the pattern!

Obviously, I made mine bigger, with 25 blocks instead of 12. I’m not sure whether I bought more paper piecing templates, or whether I traced them out myself. It’s been a loooooooong time since this one was pieced!

Here’s what it looked like when it went to the shop. Lots and lots of paper piecing for this one.

Jumping Jack Flash quilt by Judy Neidemeyer pieced by Deborah Cooke

I’m so chuffed that this one is finally finished. Here it is now – yes, another kitchen shot because the snow just keeps on coming.

Jumping Jax Flash quilt designed by Judy Niemeyer and made by Deborah Cooke

As you can see, I inverted the colours for five squares, giving them black stars instead of black backgrounds. Four have green backgrounds and the central one has a peach background. I wanted it to be a focal point, that looked illuminated compared to the others. I’m not sure that was successful, but it is what it is at this point. I am glad that I broke up the rhythm of the colours a bit.

Jumping Jax Flash quilt designed by Judy Niemeyer and made by Deborah Cooke

I don’t have the highest level of restraint with colours and fabric selection, and this quilt proves it. There’s a lot of range in my definition of peach/orange and even more in my definition of turquoise. The blacks are pretty consistent (esp for me.) The smaller stars are all half-yellow, although the intensity of the yellow varies greatly, and the second colour in each one, which started out as a bright, ended up becoming just about anything not-solid-yellow.

Jumping Jax Flash quilt designed by Judy Niemeyer and made by Deborah Cooke

The other day, I told you how I’d already sewn on the prairie points and wasn’t sure how the binding would work out. In the end, I sewed on the binding just the way I always would, but instead of enclosing the seam allowance, I pressed the binding flat on the back. It’s more of a facing than a binding, though it’s doing the same thing. That peach French shirting (that I used for the bias binding) has a woven windowpane design and I did use it on the top, so it brings it all together. I might even have enough of it left for a short-sleeved shirt.

The machine quilting is in a meander pattern. Though it looks like white thread here, it’s actually a peachy pink that coordinates quite well. I decided against adding more quilting, as the binding is sewn down almost halfway through that unquilted border.

I’m SO excited to have this one finally finished!

And now, of course, I’m thinking about what’s next. I have unfinished projects calling my name but am still tempted by this Judy Niemeyer pattern. It’s called Crimson Poppy and that link will take you to the pattern page at Quiltworx.

Crimson Poppy quilt design by Judy Niemeyer Quiltworx

Hmm. Not just paper piecing but curvy bits. I may have to hunt down a workshop for this one, as I’m not sure how you (I) would even begin to choose fabrics for it.

The Moonglow Quilt is Done!

Last week, I picked up two more finished quilts at the longarm quilting place. They both needed their edges bound, of course. For both quilts, I chose a meander quilting pattern and it proved to be the perfect choice. 🙂 It’s always so exciting to get a quilt back and have it almost finished. I end up trimming the edges right away.

For this one, I had the fabric for the bias tape already. I had it cut up and sewn onto the front of the quilt by the next morning. I’ve been handstitching it to the back ever since. It’s motivating to have a quilt almost done!

I meant to show you this Friday, but it was raining when I finished the binding on Tuesday. My plan was to take it outside then photograph it on the driveway, but no joy. Rain, rain, rain, and then Friday, the snow started. So, we get kitchen pix instead.

Here’s my finished Moonglow quilt.

Moonglow quilt made by Deborah Cooke

My first thought was that the binding could be black, but I thought that was a bit of a predictable choice. Instead, I chose this purple print and kept it very narrow. The backing is a black print with purple.

Moonglow quilt made by Deborah Cooke

I really like how this one came out.

There are a number of posts about piecing this one, which was a kit from Jinny Beyer. I began to piece it in April 2020, apparently.

Moonglow Quilt I

Moonglow Blocks

More Moonglow Blocks

Finishing the Moonglow Quilt Top

The other quilt that’s home to have its edges bound is my Jumping Jax Flash quilt, which has an edge that needs a bit of thought. Because I put prairie points on the outer edge, I asked them to leave the coral border unquilted. So, I’ll need to figure out a binding, then maybe add a bit more quilting myself to finish it up. As my friend, Terri, said, it will have more of a facing than a binding.

Here it is unquilted to show you what I mean.

Jumping Jax Flash quilt pieced by Deborah Cooke

It also has a bit of a ripple around the outer edge, as I added this coral border before I realized that strips cut crosswise will stretch a bit when sewn. Hmm. This one needs a plan – but first, I need to check in the attic to see if I have any of those fabrics still in my stash!

It has so many fabrics that it wouldn’t really matter if I used a new one for the border, but it would be more satisfying to use one that’s already in the quilt. There’s a coral French shirting that I think it in the stash – I just used a bit of it in the points, because I was planning to make myself a shirt with the rest, so I’m thinking there’s 1.5m or so stashed away.

Radiant New York Beauties

Radiant New York Beauties by Valori Wells

The other book I found on my shelf this week was Valori Wells’ Radiant New York Beauties.

Here’s an Amazon.ca buy link.

Here’s a buy link at C&T publishing.

And here is Valori Wells website.

I like her use of stripes and plaids, and also her playful freeform quilting. It’s a joyous little book. 🙂

Carnival Beauty is the quilt on the cover, although that only shows part of it. Here’s a picture from inside the book that I took:

Carnival Beauty by Valori Wells

I like that there’s a kind of a gradient in her quilt top, with the bottom being darker than the top, although I didn’t manage to accomplish that myself.

I was very excited to realize how much I’ve finished on my quilt top. Here’s my progress so far:

Deborah Cooke's Radiant New York Beauty quilt top

You can see that I need three more little suns to finish the top in this layout. Looking at this photo, I have a feeling that I was going to move that top yellow sun up half a row so it didn’t line up with the pink one so well (they’re not sewn together yet) then add more little suns around it. (That would also explain why there are two more blue background squares cut.)

Clearly, I prefer my suns being whole. 🙂 I added rick-rack around a few of them (to make them more radiant) and that’s fun, too. In the project stash, there is also some trim with mini pom-poms, so that might end up in the finished top. (Maybe around the border. Hmm.) I really like it so far and am pleased with the fussy-cutting and piecing.

This one also requires me to dig back into the stash and search for fabrics to finish up this top. Sounds like a trip to the attic is on the agenda for this weekend! This top is an exciting find as it’s almost done, and the size means I’ll be able to quilt it myself. I’m also excited that many Kaffe Fassett yarn-dyed stripes are available again, so I’ll be able to add some of them into those little suns that need making.

Tomorrow, we’ll have a look at a finished quilt. 🙂

Cinco de Mayo – designed by Karen K. Stone

Yesterday, we talked about quilting inspiration and two unfinished projects in my stash. Here’s the first one.

Karen K. Stone Quilts

This book is Karen K. Stone Quilts and the quilt on the cover is called Cinco de Mayo. There are 36 quarter circle blocks, all with different paper piecing combinations.

Here is Karen’s website. It looks like she teaches workshops about making this quilt.

I couldn’t find a good picture of the complete quilt, so I took a picture of that page in my copy of the book.

Have a look.

Cinco de Mayo by Karen K Stone

One thing I like about the book is that she shows you each group of four blocks in detail, both with a picture of each and a line drawing of the component pieces. There are (of course) pattern templates included in the book, too.

Cinco de Mayo by Karen K Stone - book details on construction

And here are my blocks so far.

My progress on my Cinco de Mayo designed by Karen K Stone

LOL. I remembered that I worked on it for AGES, but I only have four completed blocks!

After I took this picture, I realized I had sewn them together incorrectly. I picked them apart again. I didn’t start at the top left corner – these are blocks 3E, 3F, 4E and 4F. They should be rotated and positioned like this:

My first Cinco de Mayo blocks, designed by Karen K Stone

I did this mock-up digitally, which is why the carpet shows through in some places. A couple of these blocks can be swapped with others in the design, so I didn’t sew them together again yet. I see that I’ve used a turquoise print as the outside/background on all four of these blocks, so they shouldn’t be clustered together like this.

I will need to do is reassemble my stash for the project. One thing Karen teaches in her workshop is choosing a palette, then gathering fabrics that fit in each specific colourway – like that shade of turquoise, or the black with a floral print. They have to be pretty close in tone within the group, regardless of the pattern, to make the quilt cohere. (Although I will almost certainly stray too far, since chaos is how I roll.)

For this quilt design, she chose 11 colour groups. I’m using 8. I remember having trouble finding more of the particular bright yellow I used. Once your palette is gathered, you use at least one fabric from each chosen color in each block. I even kept track of what I used where in a chart – this was her suggestion to ensure that you use the colours throughout the blocks (instead of always using the turquoise for the background. I left the background off the chart, but that’s fixed now.)

You can see the palette pulling together a bit better in the quilt I made in her workshop because it used fewer colours and because you’re seeing 30 blocks together in this image. Each block has a bit of yellow and a bit of that red purple, a bit of indigo, etc. Even though the blocks are different, the whole comes together. I chose the gradient fabric for the inner border because it had both the yellow and the red-purple.

New York Beauty quilt pieced by Deborah Cooke

I need to get that one back on the quilting frame and finished up. I started the hand quilting and have done maybe 20% of it.

I still have the index card with swatches for the colours I chose for my Cinco de Mayo quilt. I’ll go through my stash and look for matches, maybe need to shop (for more yellow) then concentrate on finishing this quilt before dispersing the stash again.

In the meantime, I found another quilt top in the UFO stash that is much closer to completion. We’ll look at that one tomorrow.

Quilting Inspiration

Last weekend, I picked up two of my quilts from the long arm quilting place. I’m binding their outer edges now and will show them to you when they’re done.

New York Beauties and Flying Geese by Carl Hentsch

In the meantime, I’m already thinking about what to quilt next. 🙂

Here’s the book that’s teasing me right now: New York Beauties and Flying Geese by Carl Hentsch.

Here’s a buy link at C&T Publishing

Here’s an Amazon.ca buy link

And here is Carl Hentsch’s website.

I particularly love this design included in the book, which is called Pandemonium.

Pandemonium by Carl Hentsch

Isn’t that gorgeous? I’m currently on the hunt for a fat quarter pack of Kaffe Fassett shot cottons, including 36 colourways. That’s what he used in the rainbow sections, but it looks like they’ll be tough to find. (I could build my own spectrum of fat quarters, but I do love KF’s shot cottons. I’ll look for them first.)

In the meantime, in the spirit of finish-itis, I revisited my unfinished projects. Actually, putting this book on my shelf reminded me of several other books I have. I found two different paper piecing projects which are incomplete.

Karen K. Stone Quilts

First up, this one. A number of years ago, I attended a workshop with Karen K. Stone. The quilt I pieced there is still being handquilted (it was New York Beauty, from her pattern sold at the workshop), but I subsequently bought this book of hers – Karen K. Stone Quilts.

The quilt on the cover is called Cinco de Mayo and it is stupendously gorgeous. There are 36 quarter circle blocks, all with different paper piecing combinations.

This book is tougher to find since it’s from 2004. The AMZ link is for used copies at crazy prices, so you might have better luck at a used bookstore.

Here is Karen’s website. It looks like she teaches workshops about making this quilt.

I started a Cinco de Mayo of my own and dug it out to see where I’m at. I’ll show you its current state progress tomorrow.

Radiant New York Beauties by Valori Wells

The other book I found on my shelf was Valori Wells’ Radiant New York Beauties.

Here’s an Amazon.ca buy link.

Here’s a buy link at C&T publishing.

And here is Valori Wells website.

What’s fun about this book is that she uses stripes and plaids (lots of Kaffe Fassett yarn dyed stripes and plaids here!), and that she sometimes changes the central circle to an oval.

Her free motion quilting patterns are also fun. Lots of swirls and leaves, all the better to inspire me to get better at free motion quilting.

The pattern I found particularly inspiring is called Carnival Beauty. It’s the one on the cover, although that only shows part of it. I can’t find a picture of the complete quilt online, so will take a pic from my book when I show you my progress.

Tomorrow, we’ll look at my progress on Cinco de Mayo…

Witch Hare Kit

A bit ago, I treated myself to a knitting kit and it arrived yesterday. It’s from Virtual Yarns and is the Witch Hare kit, for mittens and a hat. You can see it on their website, right here. Virtual Yarns is Alice Starmore and Jade Starmore’s company, featuring many patterns, books and yarns designed by Alice and Jade. There’s some wonderful eye candy on their website, so treat yourself to a few minutes of browsing.

Here are the pattern cards in the kit. They really are lovely, full colour on sturdy stock. (Apologies for the flash!)

Virtual Yarns Witch Hare kit - patterns

I like this design, especially the mittens, and I was curious about the Virtual Yarns tweeds. A kit seemed a good way to check them out.

Here are the yarns in the kit. They look scrumptious.

Virtual Yarns Witch Hare kit - yarns

And here are the patterns on Ravelry, in case you want to check out some other projects. They’re listed separately – first the mittens, then the hat.

The plan is to make the set once as the kit instructs, then possibly make the mittens again with another yarn (what yarn?) held double with KSH. The ones by the kit might get a KSH lining. We’ll see. Lovely yarn, though. I can’t wait to see how it knits up.